The Norden bombsight was a tachymetric bombsight used by the United States Army Air Forces (USAAF) and the United States Navy during World War II, and the United States Air Force in the Korean and the Vietnam Wars to aid the crew of bomber aircraft in dropping bombs accurately. Key to the operation of the Norden were two features; an analog computer that constantly calculated the bomb's trajectory based on current flight conditions, and a linkage to the bomber's autopilot that let it react quickly and accurately to changes in the wind or other effects. Together, these features allowed for unprecedented accuracy in day bombing from high altitudes; in testing the Norden demonstrated a circular error probable (CEP) of 23 meters (75 ft.), an astonishing performance for the era. This accuracy allowed direct attacks on ships, factories, and other point targets. In practice it was not possible to achieve this level of accuracy in combat conditions, with the average CEP in 1943 being 370 meters (1,200 ft.).

The Norden Bombsight at the San Diego Air and Space Museum.
Both the Navy and the AAF high-altitude bombing as a means to achieve war aims, without resorting to area bombing, as proposed by European forces. The Norden was granted the utmost secrecy well into the war, and was part of a then unprecedented production effort on the same scale as the Manhattan Project.
Norden Bombsight Principles, Army Air Force Film.
Typical bombsights of the pre-war era worked on the "vector bombsight" principle introduced with the World War I Course Setting Bomb Sight. These systems consisted of a slide rule-type calculator that was used to calculate the effects of the wind on the bomber based on simple vector arithmetic. The mathematical principles are identical to those on the E6B calculator used to this day.
The Norden bombsight consisted of two primary parts, the gyroscopic stabilization platform on the left side, and the mechanical calculator and sighting head on the right side. They were largely separate instruments, connecting through the sighting prism. The sighting eyepiece was located in the middle, between the two.
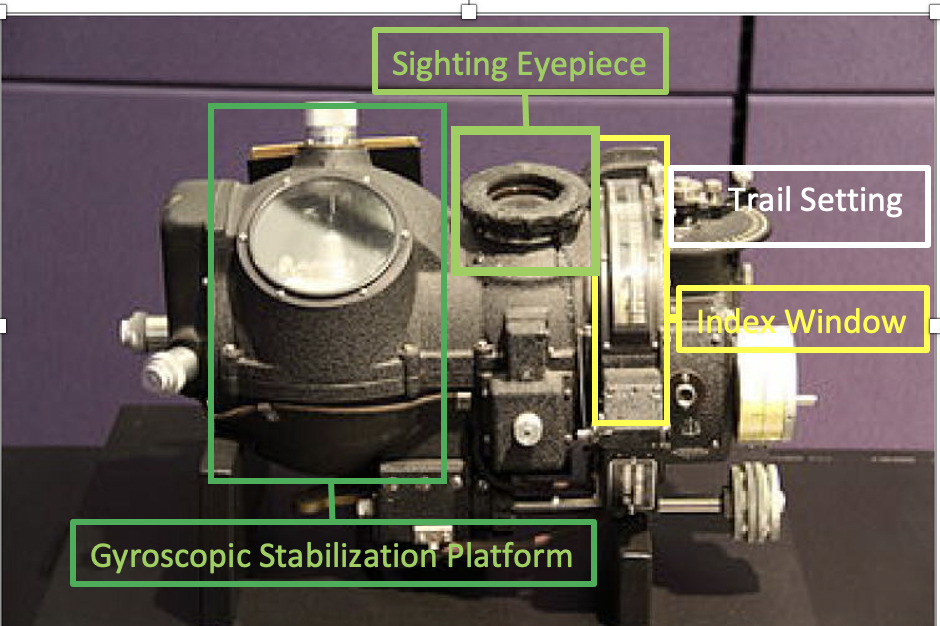
The parts of the Norden Bombsight.
Before use, the Norden's stabilization platform had to be "righted", as it slowly drifted over time and no longer kept the sight pointed "up". This was accomplished in a time consuming process of comparing the platform's attitude to small spirit levels seen through a glass window on the front of the stabilizer. Once the stabilizer was righted, the bombardier would then dial in the initial setup for altitude, speed and direction. The sighting prism would then be "clutched out" of the computer, allowing it to be moved rapidly to search for the target on the ground. Later Nordens were equipped with a reflector sight to aid in this step.
Once the target was located the computer was clutched in and started moving the prism to follow the target. The bombardier would begin making adjustments to the aim. As all of the controls were located on the right, and had to be operated while sighting through the telescope. Another problem with the Norden is that the bombardier could only adjust either the vertical or horizontal aim at a given time, his other arm was normally busy holding himself up above the telescope.

View from the Norden Bombsight sighting view.
On top of the device, to the right of the sight, were two final controls. The first was the setting for "trail", which was pre-set at the start of the mission for the type of bombs being used. The second was the "index window" which displayed the aim point in numerical form.
The bombsight calculated the current aim point internally, and displayed this as a sliding pointer on the index. The current sighting point, where the prism was aimed, was also displayed against the same scale. In operation, the sight would be set far in advance of the aim point, and as the bomber approached the target the sighting point indicator would slowly slide toward the aim point. When the two met, the bombs were automatically released. The aircraft was moving over 110 meters per second (350 ft./s), so even minor interruptions in timing could dramatically affect aim.
Norden Bombsight Conduct of a Mission, Army Air forces Film.
In USAAC use, the entire bombsight was attached to a second device, the "Automatic Flight Control Equipment" (AFCE), an autopilot system. The AFCE could be used during the flight to the target area through a control panel in the cockpit, but was more commonly used under direct command of the bombardier.
The AFCE sat behind and below the Norden and attached to it at a single rotating pivot. On the bomb run, the bombardier would first rotate the entire Norden so the vertical line in the sight passed through the target, and then clutched in the AFCE. From that point on, the AFCE would attempt to guide the bomber so it followed the course of the bombsight, and pointed the heading to zero out the drift rate, fed to it through a coupling. As the aircraft turned onto the correct angle, a belt and pulley system rotated the sight back to match the changing heading. The AFCE was another reason for the Norden's accuracy, as it ensured the aircraft quickly followed the correct course and kept it on that course much more accurately than the pilots could.
Norden Bombsight Preflight Inspection, Army Air Forces Film.
Later in the war the Norden was combined with other systems to widen the conditions for successful bombing. Notable among these as the radar system called the H2X (Mickey), which were used directly with the Norden bombsight. The radar proved most accurate in coastal regions, as the water surface and the coastline produced a distinctive radar echo.
An interesting footnote to the Norden bombsight story is that although the Americans treated the instrument with utmost secrecy....it was no secret to the Germans. A spy who worked at the Norden company passed along the details of the bombsight to the Germans before America entered World War Two.
2001 Pan American Plaza, San Diego, CA
Phone: 619.234.8291
Información En Español
Contact Us
We would like to thank all our sponsors who help us make a difference. Click here to view all who help us.
The San Diego Air & Space Museum is a 501(c)(3) non-profit organization. Federal Tax ID Number 95-2253027.